NoSQL Databases
Note
Being edited.
Not long ago, most web applications did not have a large number of users accessing them daily. In those times, having 1,000 users a day was considered to be a large userbase. As time passed, and more and more users gained Internet access, the number of users for popular web applications ballooned. Some web applications and services have millions of users per day. Modern web applications also keep much more detailed records of their users and their habits.
Unfortunately, traditional relational databases are not well suited to handling large amounts of data in web and business applicatons. As a result, a new type of database technology is required to handle large amounts of data efficiently, one that did not use the old relational database model. These kinds of databases either don’t use SQL at all, or if it was used, it was wrapped with other technologies to make the SQL console invisible to the user. As time progressed, many different kinds of ‘NoSQL’ databases emerged, distancing themselves from the relational database model.
CouchDB
CouchDB is a document-based NoSQL database developed by Apache. Once starting CouchDB, a user is presented with the message; Apache CouchDB has started. Time to relax.
This slogan emphasizes the concept of truth in advertising, as many of CouchDB’s functionalities are designed to make the developer’s life easier and allow them to be more productive. CouchDB’s core concepts are simple and relatively easy to understand for developers who have used other databases in the past.
Features of CouchDB
CouchDB uses many languages and technologies that are already common in web development. It uses JSON (JavaScript Object Notation) as a means of storing data, and JavaScript as the query language. The queries are done with MapReduce, a model for processing big data in a distributed algorithm using a cluster. It also can be integrated with RESTful web services with relative ease.
CouchDB has an administration panel called Futon that can be accessed with any web browser. It looks and functions similar to phpMyAdmin.
ACID Semantics
Like many other NoSQL databases, CouchDB provides eventual consistency, but it also provides ACID semantics with its file layout, a feature that is not common among NoSQL databases. ACID is an acronym which stands for Atomicity, Consistency, Isolation, Durability. It is a set of guidelines for guaranteeing that database transactions will be performed reliably. Atomicity requires that the entire transaction must not fail, therefore, if one part of the transaction fails to process, the whole transaction faile to process, and the database is left unchanged. Consistency, when referring to databases, is the assurance that any transaction will not violate any of the defined rules of the database. Isolation refers to the database’s ability to provide concurrency control, or allowing two transactions to happen at the same time without fail. Durability is the database’s ability to ensure that as soon as a transaction is committed, that it always stays committed, regardless of software or hardware failure.
In CouchDB, document updates are serialized (as you will see later) with revision numbers, and it allows multiple users to read or write to the same document without being interrupted or locked out. For its read operations, CouchDB uses a Multi-Version Concurrency Control (MVCC) model, which shows the client a consistent state of the database throughout the operation.
Self-Contained Data
By it’s nature as a document-based database, CouchDB’s data does not depend on a schema, and is all self-contained. Data that is self-contained does not have any abstract references to other documents, which may appear puzzling at first. Abstract references, after all, are a significant part of how to model data in a relational database. However, relational databases depend on the designer modelling the data prior to it being used, forcing all rows to adhere to a set structure, even if that structure is flawed. Any errors or oversights in designing a relational database can be very costly later.
Consider a table in a relational database that contains the following information about a person. Assume each item on the list is its own column;
First name
Middle name
Last name
On paper, this appears to be a simple way of showing a person’s name. However, if a person does not have a middle name, this could force someone’s middle name to be rendered as “None” or “null”. Consider, also, scenarios where a person may have multiple middle names. Theoretically, both middle names could be placed in the middle name field. But, if the middle name field is ever shortened, problems can arise. For example, “John Martin Smith” would be shown as “John M. Smith”, “Catherine Mary Louise Jones” might be shown as “Catherine M. Jones”. Simply choosing to render capital letters only is problematic as well, especially in cases where someone’s middle name may contain two capital letters. Regardless of how you would solve this problem with a relational database, the obvious problem is that not all of the data fits the structure that the developer has selected.
A CouchDB document could find much easier ways around this problem. A person with no middle name does not require a middle name field at all, and a person with multiple middle names can have each of them listed in their own fields. Since CouchDB does not use a set schema, the data modelling is done after the document has been created, allowing for more flexiblity. Slight design alterations such as adding functionality for multiple middle names are considerably easier to do with CouchDB than they are with a relational database. An example of how to implement this will be shown below.
Futon
Futon is the name of the browser-based control panel that CouchDB uses. By default, CouchDB can be accessed by entering http://127.0.0.1:5984/_utils/index.html into your web browser. Upon loading Futon, the user will be greeted by this screen.
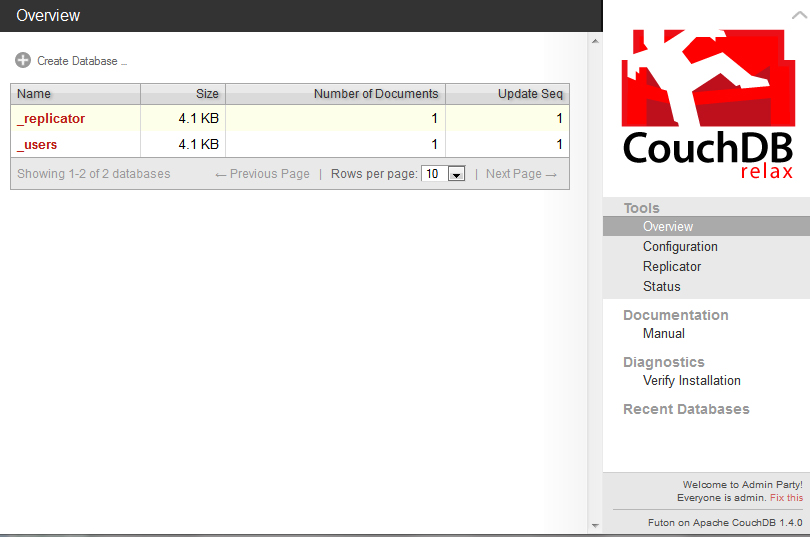
Underneath the Overview, you can see the a list of all the existing databases, how big they are in kilobytes, how many documents they hold, and how many times they’ve been updated. On the right side, there are links to the main page (which we are on), the configuration page, the replicator, and a status page. Below these, the user can see the documentation type and any diagnostics that need to be run. In this screenshot, you will notice that the installation of CouchDB needs to be verified. Upon clicking on “Verify Installation”, Futon will check your installation and make sure there are no errors in it. Doing this will also create two test databases (test_suite_db and test_suite_db2), however, we will be leaving those alone.
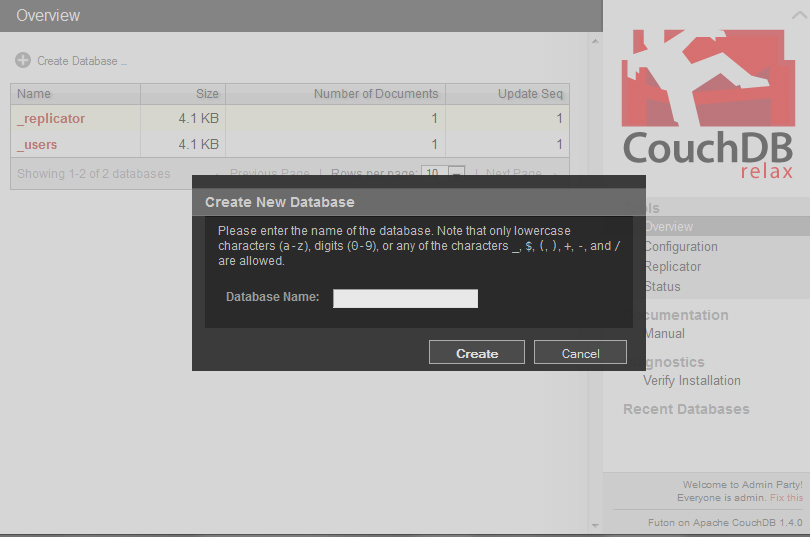
A new database can be created by clicking on the Create Database icon above the list of databases. The user will then be presented with a small, black popup window in which they will enter the name of the database they wish to create and then click Create.
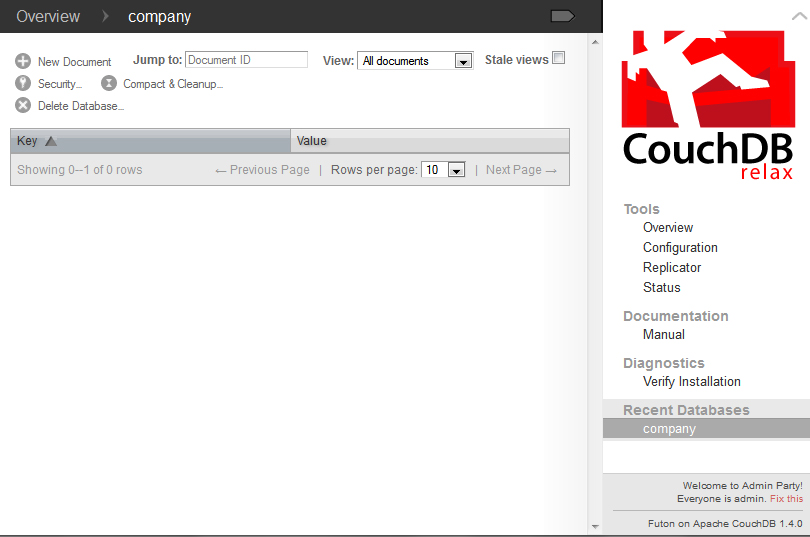
For this example, we will make a database called “company”. In this database, we will explore the middle name dilemma that was explained earlier in this reading. To create a new document, click the button in the top left corner with the words “New Document” next to it.
Once a new document is created, CouchDB will assign it an ID with the _id field, which you can change if you choose to do so. However, the document ID must be a string, and it can not be changed once the document has been saved. In these examples, I made the ID of all of the documents identical to the last names of the employees.
To add more fields, click the button with a plus sign in the middle with “Add Field” next to it.

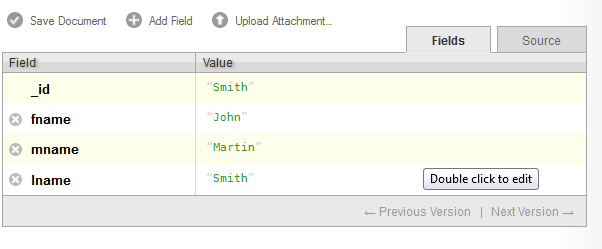
When you create a new field, you will be given a chance to type a name and a value in. You can not assign the same name to two fields in one document. In the figure above, I created three fields, fname, mname, and lname, to represent the first name, middle name, and last name of one employee. First, I started with John Martin Smith.
When you are done editing the fields, click the green circular button with a check mark to indicate you are finished for now. You can edit the text again by clicking on it. To remove a field, click on the gray and white X button on the left side of the field’s name.
As you have undoubtedly noticed, CouchDB has made entering data with Futon very easy. Since the data structure is not yet defined, you do not need to set a value as being of any particular type.
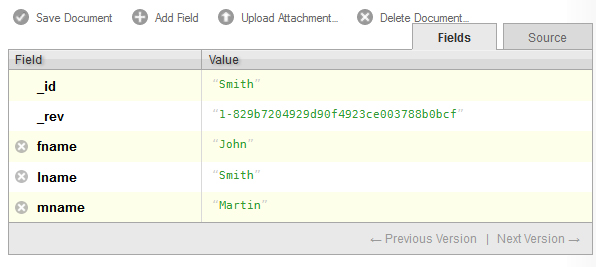
Once you are done editing all of your fields, you may save the document by clicking Save Document. Once a document is saved, Futon adds a revision field, _rev, after the _id field, as can be seen above. You may notice that CouchDB sorts the fields alphabetically once the document is saved. The _rev field is used for replication, which will be explained in more detail later.
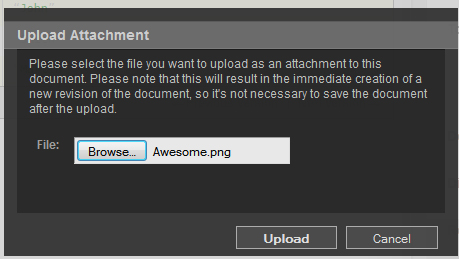
Attachments may be added to documents in Futon by clicking the Upload Attachment button. Upon clicking it, a black box like the one above will appear, asking you to look for a file to attach. I decided to attach a small .png file titled ‘Awesome’.
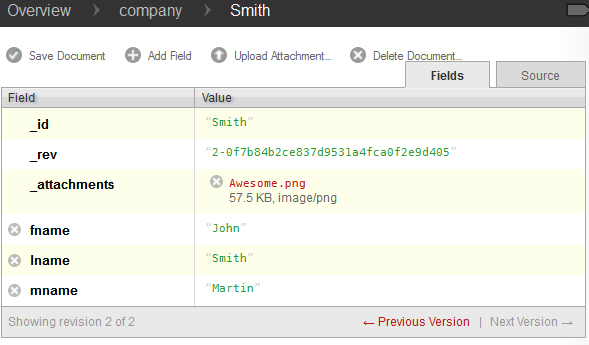
After clicking Upload, the attachment will appear in the _attachments field, as can be seen above. Now, save the document and click Source to see the JSON source for your document.
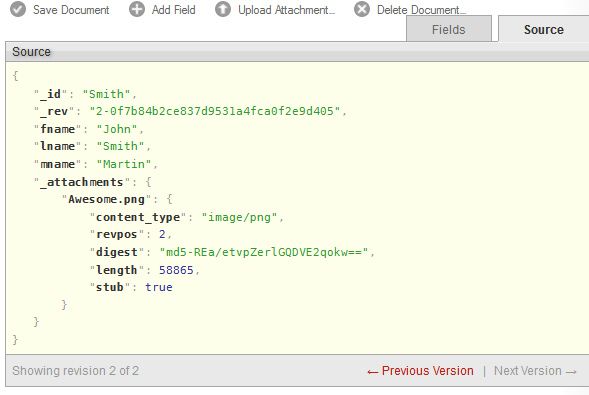
Should you ever want to modify the JSON directly, you can do so by double clicking on the text, as the white bubble indicates. Before continuing on, I will add documents for “Catherine Mary Louise Jones”, who has two middle names, and “Jim Clark”, who has no middle name.
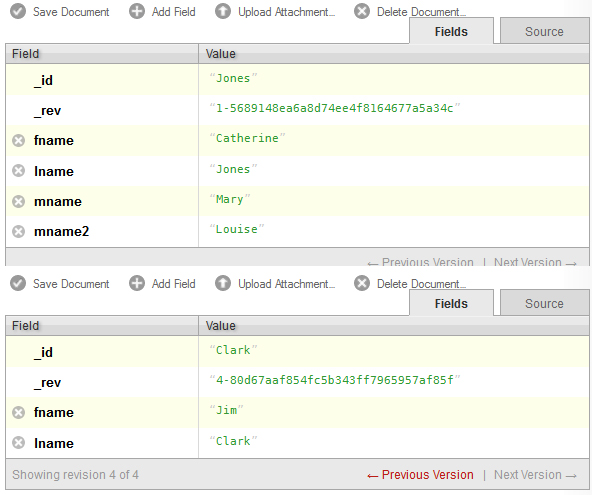
As you see here, Catherine Mary Louise Jones has the mname2 field to desginate the order of her two middle names. Jim Clark has no middle name, so that field is not even present in his document.
Replicaton and the Replicator
CouchDB’s replicator allows for the database to make copies of itself. Unlike MongoDB’s replication functionality, which only allows master servers to replicate to slave servers, CouchDB’s replication allows for all servers to make copies to each other. This kind of master-master replication is possible because of the way CouchDB stores revision data. In this way, all replication commands are essentially the same as passing several update commands to a new database.
Problems can arise, however, in scenarios where two users/servers make conflicting updates. Let’s say two users (who we will unimaginatively refer to as A and B), pull _rev “1-dfdfd”. User A makes a change and commits _rev “2-aaaa”, only for User B to commit their own revision, which is in conflict with User A’s. Since User B is updating to a _rev that is no longer the current _rev, their changes are rejected. Depending on the application, it is reasonable to either apply User B’s revision to User A’s, or to give User B the chance to edit the document again to see the changes that User A had made before.
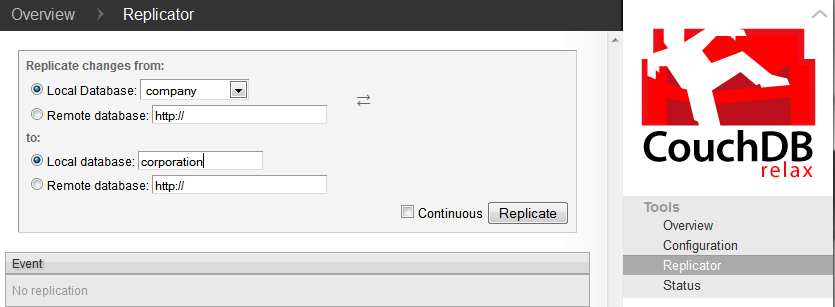
Futon has a replicator feature, which can be seen below. Here, we are making a copy of the earlier company collection and replicating it to corporation.
Querying CouchDB with Java
One of the more useful aspects of CouchDB is Apache’s choice of using JSON as the query language. Given that JSON is a fairly common format, a Java library will be required in order to make the most out of CouchDB. For the following examples, I chose to use Json-lib, which can be obtained either from the example projects I bundled with the reading, or on Sourceforge. Another Java library will be required in order to here are many different Java libraries that can be used to interface with CouchDB. There are many libraries that can communicate with CouchDB, but for these examples, I chose CouchDBJ4. There are other Java libraries such as Ektorp that can also interface with CouchDB, but they are not covered here. Both JSON-Lib and CouchDB4J have their own list of dependencies that are needed for both to run. Below is a list of all of the libraries that I used for the sample code;
JSON-Lib 2.4
CouchDB4J
EZMorph 1.0.3
Apache HTTPCore 4.3.1
As well as the following libraries from the Apache Commons;
Collections 3.2.1
BeanUtils Core and Collections 1.8.3
Lang 2.6, some changes were made to Apache Commons Lang after 2.6 that do not cooperate with CouchDB4J.
Logging 1.1.3
Codec 1.6
Collections 3.2.1
CouchDB4J
CouchDB4J is an open-source Java library used to interact with CouchDB. Like many things involving CouchDB, it is very simple to operate and use.
Sessions and Databases
In order to connect to CouchDB, you must create a Session object, which can be instantiated by one of three ways, depending on how the database itself is configured.
//Six arguments.
Session s = new Session(String host, int port, String user, String pass, boolean usesAuth, boolean secure);
//Four arguments.
Session s = new Session(String host, int port, String user, String pass);
//Two arguments. If working off localhost, this should be enough.
Session s = new Session(String host, int port);
As can be seen, the Session object takes a maximum of six arguments; one for the host URL, port number, username, password, and two booleans for if the session will require authentication and if the connection is an SSL connection.
Warning
CouchDB does not support SSL connections natively, if you plan on using a SSL connection, you will need a proxy.
Once you have created your Session object, you need a Database to interact with. To interact with the company database that was created earlier in this reading, you would call the getDatabase() method in the Session object to retrieve the database by name. In the following example, I am connecting to localhost with the default port number.
Warning
If you call a database that does not exist with Session.getDatabase(), you will receive an error message, but your program will not crash unless you perform an operation. So, if Database db = s.getDatabase(“company”); does not exist, an error will be printed, but the program will continue and give Database db a null value.
//Import statements.
import com.fourspaces.couchdb.Session;
import com.fourspaces.couchdb.Database;

... //Some code here.

Session s = new Session("localhost",5984);
Database db = s.getDatabase("company");
If, however, we decided to create a new database in Java, the last line would call a different method in the Session object. Instead of calling getDatabase(), we would call createDatabase() and insert the database name we wish to create in there, as can be seen below.
Warning
If you create a database that already exists, you will receive an error message and Database db will be assigned a null value to prevent you from writing to an existing database that you were not aware of.
//Import statements.
import com.fourspaces.couchdb.Session;
import com.fourspaces.couchdb.Database;

... //Some code here.

Session s = new Session("localhost",5984);
Database db = s.createDatabase("newDB");
Now, let’s check Futon to see the new database that has been created by this code.
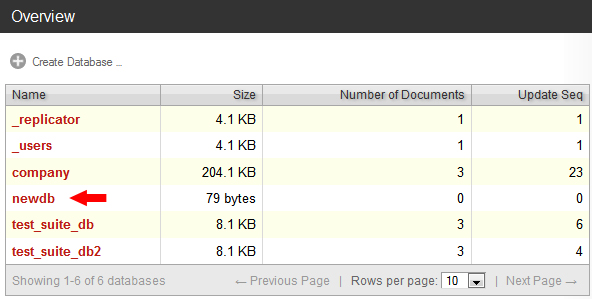
Now that we know how to create and access a Database, let’s perform basic CRUD (Create, Read, Update, Delete) operations on it. The most basic of those operations is reading a document, so we will start with that. Since the newDB database has no contents as of this moment, we will do all of these operations on the company database created earlier.
In CouchDB4J, there is a Document object that represents a document in CouchDB. Document objects can be retrieved from the database by their unique ID as can be seen below, where I search the database for a document with the ID “Smith”.
//Import statements.
import com.fourspaces.couchdb.Session;
import com.fourspaces.couchdb.Database;

... //Some code here.

Session s = new Session("localhost",5984);
Database db = s.getDatabase("company");
     try {
     Document doc = db.getDocument("Smith");
     }
     catch (IOException e) {
     e.printStackTrace();
     }
Document objects can be pulled from the database as you saw above. To prevent any possible IOException, it is advised to surround all Document calls with a try/catch clause as highlighted in the above example. Document objects are essentially wrappers for a JSONObject, and can use all of its functionalities.
Reading Documents
Earlier in this reading, a dilemma was raised about how to properly render a person’s full name, including middle names, without encountering problems and without creating fields that might be left as null and thus wasting space on the database. We will now demonstrate this with a small program that queries the company database and pulls out the document with the ID Smith. Once it has the document, it will check for the following fields; fname, mname, mname2 and lname and, if they exist, print them. If the field does not exist, it will be ignored.
Checking for the String value can be accomplished with Document.getString(String fieldname), however, this is not advised, as if the field does not exist, it will return null. Largely thanks to JSONObject, you can use Document.optString(String fieldname, String defaultValue), which will check the JSONObject to see if the field name exists. If it has content, it will return it as a String, otherwise it will return the default value that you passed to it. For our use here, this is exceptionally useful since we no longer have to concern ourselves whether or not the field has content. It also demonstrates that the data structure in CouchDB is only created when the data is needed, since we are assigning the default value of fields at run-time instead of setting the default field in advance.
Simply calling all of the fields and extracting their data is not enough, however, as the Strings we obtain need to be formatted properly. Thus, they are passed to a static factory method that checks if the String has at least 1 character in it, and then returns it with a space added to the end of it.
     import java.io.IOException;
     import com.fourspaces.couchdb.Database;
     import com.fourspaces.couchdb.Document;
     import com.fourspaces.couchdb.Session;

     public class Example01_ReadandPrintOneName {

             public static void main(String args[]) {

                     // Create session, select database.
                     Session s = new Session("localhost", 5984);
                     Database db = s.getDatabase("company");

                     try {
                             // Get the document ID
                             Document doc = db.getDocument("Smith");

                             // Use optString instead of getString so that in case the field
                             // doesn't exist, you can return a default value.
                             String fname = doc.optString("fname", "");
                             String mname = doc.optString("mname", "");
                             String mname2 = doc.optString("mname2", "");
                             String lname = doc.optString("lname", "");

                             // Print the string.
                             System.out.print(addSpacing(fname) + addSpacing(mname)
                                             + addSpacing(mname2) + addSpacing(lname));

                     } catch (IOException e) {
                             e.printStackTrace();
                     }

             }

             // Used for quick formatting if the String has at least 1 character in it,
             // it adds a space to the end of it. Used so "Jim Clark" is not rendered as
             // "Jim   Clark".

             public static String addSpacing(String str) {

                     if (str.length() > 0) {
                             return str + " ";
                     } else
                             return str;

             }

     }
Output:
John Martin Smith
To call all of the documents in the database, you will need to use a ViewResults object. A ViewResults object is an extension of the Document object, but used to obtain information about the results of a query. When using ViewResults, remember that you will not get each document, and that you will have to iterate through the ViewResults to get each of the Documents in your query with a for loop.
     import java.io.IOException;
     import com.fourspaces.couchdb.Database;
     import com.fourspaces.couchdb.Document;
     import com.fourspaces.couchdb.Session;
     import com.fourspaces.couchdb.ViewResults;

     public class Example02_ReadandPrintAllNames {

             public static void main(String args[]) {

                     // Create session, select database.
                     Session s = new Session("localhost", 5984);
                     Database db = s.getDatabase("company");

                     ViewResults viewRes = db.getAllDocuments();
                     for (Document d: viewRes.getResults()) {

                             try {
                                     Document doc = db.getDocument(d.getId());
                                     String fname = doc.optString("fname", "");
                                     String mname = doc.optString("mname", "");
                                     String mname2 = doc.optString("mname2", "");
                                     String lname = doc.optString("lname", "");

                                     System.out.print(
                                                     addSpacing(fname) +
                                                     addSpacing(mname) +
                                                     addSpacing(mname2) +
                                                     addSpacing(lname) +
                                                     "\n");

                             } catch (IOException e) {
                                     e.printStackTrace();
                             }

                     }

             }

             // Used for quick formatting if the String has at least 1 character in it,
             // it adds a space to the end of it. Used so "Jim Clark" is not rendered as
             // "Jim   Clark".

             public static String addSpacing(String str) {

                     if (str.length() > 0) {
                             return str + " ";
                     } else
                             return str;

             }

     }
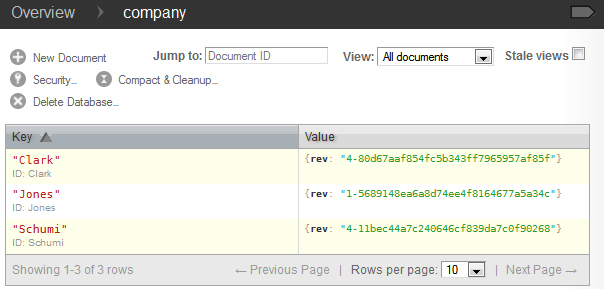
Output:
Nov 10, 2013 8:18:56 PM com.fourspaces.couchdb.ViewResults getResults
INFO: {"id":"Clark","key":"Clark","value":{"rev":"4-80d67aaf854fc5b343ff7965957af85f"}}
Nov 10, 2013 8:18:56 PM com.fourspaces.couchdb.ViewResults getResults
INFO: {"id":"Jones","key":"Jones","value":{"rev":"1-5689148ea6a8d74ee4f8164677a5a34c"}}
Nov 10, 2013 8:18:56 PM com.fourspaces.couchdb.ViewResults getResults
INFO: {"id":"Smith","key":"Smith","value":{"rev":"2-0f7b84b2ce837d9531a4fca0f2e9d405"}}
Jim Clark
Catherine Mary Louise Jones
John Martin Smith
As you can see in the example shown above, the highlighted lines show what changes will need to be made to query all documents in the database. In the output, you will notice that the for loop condition Document d: viewRes.getResults() will cause all of the documents to appear in the output.
However, selecting all of the documents in the database is usually not ideal – perhaps we only wish to select one or two documents. In that case, we need an ad hoc (“for this” in Latin) view of the database. Fortunately, accomplishing this feat is fairly simple. Say we only want to return documents in the company database where the field fname equals Jim. To do this, we simply call Database.adhoc(String query), which returns a ViewResult of the documents that satisfy the query. Remember that even though the query is written in as a String, it is still a JavaScript function written as a String. An example can be seen below, with the changes and query highlighted.
      /** * @author Cooper Wickum */

      import java.io.IOException;
      import com.fourspaces.couchdb.Database;
      import com.fourspaces.couchdb.Document;
      import com.fourspaces.couchdb.Session;
      import com.fourspaces.couchdb.ViewResults;

      public class Example03_ReadandPrintOneSpecificName {

              public static void main(String args[]) {

                      // Create session, select database.
                      Session s = new Session("localhost", 5984);
                      Database db = s.getDatabase("company");

                      // Select all documents with the field fname with Jim as the contents.
                      ViewResults viewRes = db.adhoc("function (doc) { if (doc.fname=='Jim') { emit(null, doc); }}");

                      for (Document d : viewRes.getResults()) {

                              try {
                                      Document doc = db.getDocument(d.getId());
                                      String fname = doc.optString("fname", "");
                                      String mname = doc.optString("mname", "");
                                      String mname2 = doc.optString("mname2", "");
                                      String lname = doc.optString("lname", "");

                                      System.out.print(addSpacing(fname) + addSpacing(mname)
                                                      + addSpacing(mname2) + addSpacing(lname) + "\n");

                              } catch (IOException e) {
                                      e.printStackTrace();
                              }

                      }

              }

              // Used for quick formatting if the String has at least 1 character in it,
              // it adds a space to the end of it. Used so "Jim Clark" is not rendered as
              // "Jim   Clark".

              public static String addSpacing(String str) {

                      if (str.length() > 0) {
                              return str + " ";
                      } else
                              return str;

              }

      }
Output:
Nov 11, 2013 4:20:08 PM com.fourspaces.couchdb.ViewResults getResults
INFO: {"id":"Clark","key":null,"value":{"_id":"Clark","_rev":"4-80d67aaf854fc5b343ff7965957af85f","fname":"Jim","lname":"Clark","_deleted_conflicts":["2-e28f11da32baf6cb5b1213f1f97a63c9"]}}
Jim Clark
Creating Documents
Creating documents in CouchDB using Java is not a very difficult task. To create a new document in the CouchDB database, first create a new Document object. When creating the new Document object, you can either leave no arguments, or use an existing JSONObject as the argument. Since a Document object contains a JSONObject, this is viable. In the following example, however, we use the no argument constructor.
Then you can set each of your Document’s fields by using Document.put(Object arg0, Object arg1), where arg0 is the name of the field, and arg1 is the contents of the field. This is not advisable for designating the document’s ID, as there is a separate method, Document.setId(String id), that is intended for designating the ID of a document. Once you are done filling in all of the required fields, you must call Database.saveDocument(doc), where doc is the Document object you just created.
Below is a short example that creates a document, inserts two fields, and then saves it. The lines that show the document getting created are highlighted.
/** * @author Cooper Wickum */
import java.io.IOException;
import com.fourspaces.couchdb.Database;
import com.fourspaces.couchdb.Document;
import com.fourspaces.couchdb.Session;
public class Example04_CreateDocument {
public static void main(String args[]) {
// Create session, select database.
Session s = new Session("localhost", 5984);
Database db = s.getDatabase("company");
// Create the new document, assign fields.
try {
Document doc = new Document();
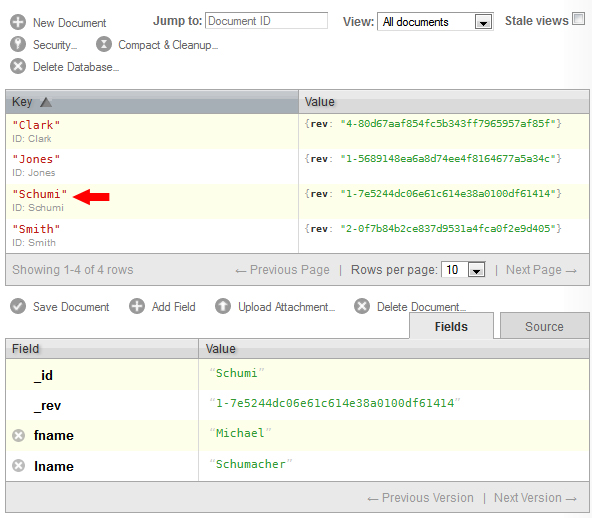
doc.setId("Schumi");
doc.put("fname", "Michael");
doc.put("lname", "Schumacher");
db.saveDocument(doc);
} catch (IOException e) {
e.printStackTrace();
}
}
}
Here is the document as it appears in Futon.
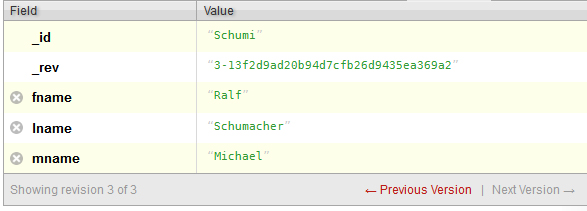
Updating Documents
The same methods we have used to read and create documents can be used to update a document. Let’s update the document we just created and change the fname field from Michael to Ralf. In addition, we will add the mname field and assign it the value of Michael.
To edit a field in a document, first we must call the document that we wish to change. In this instance, I chose to call by ID since the ID is known. Once we have the document, we use Document.put(arg0, arg1) to edit a field. To change fname from Michael to Ralf, we would use Document.put(“fname”, “Ralf”).
Warning
The put(arg0, arg1) method does not care if there is information already in a field, it will overwrite it if that field exists, and if the field doesn’t exist, it will create a new field.
Below is an example of what was described above, and a screenshot of the output in Futon.
      /** * @author Cooper Wickum */

      import java.io.IOException;
      import com.fourspaces.couchdb.Database;
      import com.fourspaces.couchdb.Document;
      import com.fourspaces.couchdb.Session;

      public class Example05_ChangeDocument {

              public static void main(String args[]) {

                      // Create session, select database.
                      Session s = new Session("localhost", 5984);
                      Database db = s.getDatabase("company");

                      // Call the document we want to change, edit a field, save.
                      try {
                              Document doc = db.getDocument("Schumi");
                              doc.put("fname", "Ralf");
                              doc.put("mname", "Michael");
                              db.saveDocument(doc);

                      } catch (IOException e) {
                              e.printStackTrace();
                      }

              }

      }
One functionality that has not been demonstrated yet is the ability to delete fields. So let’s take the above example and remove the mname field entirely. To remove a field, call Document.remove(String arg0), where arg0 is the name of the field you wish to remove.
      /** * @author Cooper Wickum */

      import java.io.IOException;
      import com.fourspaces.couchdb.Database;
      import com.fourspaces.couchdb.Document;
      import com.fourspaces.couchdb.Session;

      public class Example06_DeleteField {

              public static void main(String args[]) {

                      // Create session, select database.
                      Session s = new Session("localhost", 5984);
                      Database db = s.getDatabase("company");

                      // Call the document we want to change, remove a field by name, save.
                      try {
                              Document doc = db.getDocument("Schumi");
                              doc.remove("mname");
                              db.saveDocument(doc);

                      } catch (IOException e) {
                              e.printStackTrace();
                      }

              }

      }

      .. figure::  images/couch/futon_14.jpg
 :align:   center
 :alt: The document we just changed.
Deleting Documents
      /** * @author Cooper Wickum */

      import java.io.IOException;
      import com.fourspaces.couchdb.Database;
      import com.fourspaces.couchdb.Document;
      import com.fourspaces.couchdb.Session;

      public class Example07_DeleteDocument {

              public static void main(String args[]) {

                      // Create session, select database.
                      Session s = new Session("localhost", 5984);
                      Database db = s.getDatabase("company");

                      // Call the document we want to delete, and then delete it.
                      try {
                              Document doc = db.getDocument("Smith");
                              db.deleteDocument(doc);

                      } catch (IOException e) {
                              e.printStackTrace();
                      }

              }

      }
MongoDB
MongoDB is an open-source document-based database that was written in C++. It is the most widely used NoSQL database, being used by companies such as MetLife, MTV, MyEdu, SAP, Sourceforge, Stripe, Under Armour, and many, many others (in case you wish to see the full list compiled by MongoDB themselves, it is viewable on MongoDB’s own website: http://www.mongodb.org/about/production-deployments/).
Features of MongoDB
MongoDB stores all of its documents in BSON (Binary JSON). The problem with BSON documents is that they are larger than JSON documents. Recent versions of MongoDB allow for documents as large as 16MB, however, if you are using documents that large, it is likely that your documents are improperly designed. If, however, you need to use documents that large, GridFS is a much better alternative. Generally speaking, it might be best to avoid creating large documents, especially if they are updated often, as those operations may take a significant amount of time.
Unlike CouchDB, which provides eventual consistency, MongoDB provides enforced consistency.
Replication and Replica Sets
In order to ensure that data is always available to users, MongoDB provides a form of replication in the form of replica sets. Replication protects a database by having multiple copies of the data on multiple servers. By making additional copies of the data, one or more copies can be designated for disaster recovery and backups. In this way, it is possible for MongoDB to recover from either service or hardware failures. Replication can also be used to increase the capacity of read operations, since read and write operations can be performed on completely different servers.
MongoDB introduces the concept of a replica set, which is a group of up to 12 mongod instances that hold the same data set. The primary mongod instance is used for all write operations. Each replica set can only have one primary mongod instance, and because of this, replica sets provide for strict consistency. The other members of replica sets are either secondaries, which use operations given to them by the primary so that their data sets are identical, and arbiters, whose purpose will be explained later in this reading.
For replication to function, the primary records all of the changes made to its data sets in it’s oplog. An oplog (short for operations log) is a record of all operations that modify the data. Once these operations are applied to the primary, they are passed to the secondary members of the replica set. A diagram can be seen below.
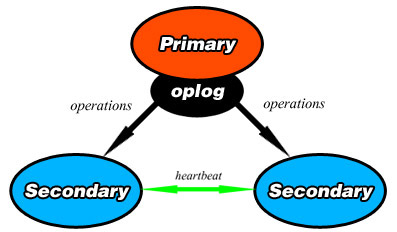
Once an operation is passed to the secondaries, they each apply it and record it in their own oplogs. To ensure replication, each member of the replica set sends a heartbeat (essentially a ping) to every other member in the replica set evert two seconds.
Arbiters
An arbiter is an element in a replica set which does not contain a dataset. It’s only purpose is to vote in elections, they cannot become the primary. As a result, the arbiter’s best use is as a tiebreaker when there are an even number of members in a replica set. Since the arbiters do not hold a copy of the data set, they do not require any additional hardware to operate, and operations from the primary’s oplog are not passed to them.
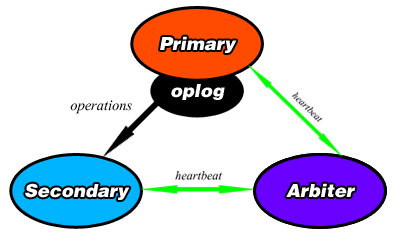
A diagram showing a primary, secondary, and an arbiter in a replica set.
Elections
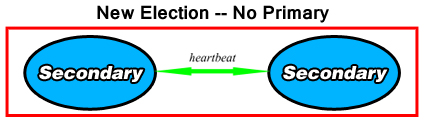
When a replica set is created, the primary steps down, or when the primary becomes unavailable for more than 10 seconds, the remaining elements of the replica set will hold an election to determine which of the secondaries will assume the role of the primary. Elections take some time to complete, and as a result, MongoDB attempts to avoid them unless there are no other options.
Similarly to the real world, each member in the replica set has certain factors that set them apart from other candidates. Some of those factors are listed below.
If a heartbeat from one member does not return after ten seconds, the others will consider that the member is inaccessible.
Each member in the replica set has a priority value attached to it. This value can be from between 0 and 100 (including decimals), and its only purpose is for eligibility to become the primary during an election. The higher the priority value, the more likely the element will become primary. A priority of 0 renders it impossible for a secondary to become a primary.
The timestamp of the last operation applied from the oplog, called the optime, is also a factor. The more recent the optime is, the greater its chances are at becoming primary.
The ability for a replica set to be able to connect to a majority of the other members of the set.
Warning
If no partition of the network contains a majority of the replica set, the replica set will not hold an election for a new primary and will become read-only. One way to avoid this situation is for a majority of the replica set to exist in one location, and the minority of instances elsewhere.

Automatic Sharding
Among MongoDB’s core functionalities is that it utilizes horizontally scaling, also known as sharding. Sharding is the practice of dividing the data set and distributing each piece, or shard of the data set to different servers as an independent database. The shards form one single database logically, even though they may be in different locations. As the number of shards increases, the operations that each shard has to handle decreases, as does the amount of data each shard possesses.
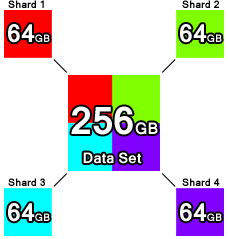
The above diagram shows the basic idea of sharding. Each of the four colored boxes in the corners is part of the multicolored box in the center (representing the complete data set), but they all exist separately in different locations.
Warning
You cannot perform sharding on a collection larger than 256GB – this is a limitation that MongoDB will eventually remove. Earlier versions of MongoDB had a much smaller limit.
Connecting to MongoDB
In order to connect to your local MongoDB, open another command prompt and type in C:\MongoDB\bin\mongo.exe company. This will connect to the mongod.exe process that is already running on port 27017 on the database named company. If you do not specify a database name at the end of this command, you will connect to the database named test.
CRUD in MongoDB – Command Prompt
Creating Documents
In order to perform any further operations in MongoDB with the command prompt, we must first add a database. Fortunately, both can be done at the same time. We will emulate the naming dilemma seen in the CouchDB examples, but we will also assign everyone an age, which will be intended to be an integer value.
Inside each database are buckets called collections, which will hold all of our data. We will place everyone in a collection called staff. Since we can create our first document at the same time we create the collection, let’s enter the following into mongo.exe:
db.staff.insert( { fname: "Mike", lname: "Conway", age: 29 } )
Similarly to CouchDB, you have to specify the document’s ID when you create it. However, there are two other ways to add a document into MongoDB. The second method uses the update() method with the upsert attached. The upsert flag allows for the document to be created if it does not already exist. This is shown below;
db.staff.update( { _id: 477 },{ $set: { fname: "Kevin", mname: "James", lname: "Conway", age: 34} },{ upsert : true } )
The above code looks for a document with the ID of 477 as can be seen in the first set of {} brackets. The second set chooses what values will be added to the document, and if upsert is true, it will create the document if it does not match an existing document. As you may have noticed, unlike in CouchDB, MongoDB does accept integer values for its _id tag.
The third method to create a document in the command prompt is to use the save() method. To use this method to make a new document, you have to ensure that either the _id you specified does not exist, or that you do not enter the _id field at all. For our demo, we know that the only _id that should exist so far is 477, with the previous document, so we will assign this document the _id of 478.
db.staff.save( { _id: 478, fname: "Mike", mname: "William", lname: "Dawes", age: 18 } )
Reading Documents
Now that we have added three documents, let’s display all of the documents that we have added to the staff collection. To view every document in a collection, type the following command into your mongo.exe command prompt.
db.staff(find)
Output:

As you can see, the first document (the one we did not enter an _id for) has a long ObjectID, and using the update command will insert the fields in the document in alphabetical order. Both the insert and save methods entered them in the same order they were entered when they were created. Variance among the order of fields may be somewhat confusing, so it is best to avoid doing that.
First, let’s do a basic selection by selecting all documents in the staff collection where the age field is equal to 18. When we display these documents, let’s show _id, mname, and age. We do not need to tell Mongo to return the _id, so we only specify mname and age.
db.staff.find( { age: 18 }, { mname: 1, age: 1 } )
Output:

Note
If we don’t want to return the _id, we would add _id: 0 to the second set of brackets in the query.
Now lets pull all documents in which the age field is greater than 18. Notice that this is only a slight modification of the previous query.
db.staff.find( { age: { $gt: 18 } }, { mname: 1, age: 1 } )
Output:

In the query above, you may notice, in the first set of brackets, there is a query operator $gt, which stands for ‘greater than’. Many, if not all of the same query operators that exist in SQL operators exist in MongoDB, the basic comparison and logical operators are listed below;
Note
$gt - Greater than
$gte - Greater than or equal to
$lt - Less than
$lte - Less than or equal to
$ne - Not equal to
$in - Returns documents that contain the specified values in an array. To return all documents where the field type contains either bird or cat, use find( {type: {$in: [‘bird’, ‘cat’] } } )
$nin - Returnss documents that to NOT contain the specified values in an array.
$and, $or, $not, $nor - Logical operators.
$exists - Returns documents that contain the specified value(s).
$type - Returns documents that have a field of the specified type.
$where - Essentially the same as a WHERE clause in MySQL, except in this case, $where is a JavaScript function.
Sometimes, it may make it easier if query results were sorted by a certain numerical value. In cases like these, we would append .sort() to the end of our query. When using sort(), you have to specify what value you want to use as your sort key and whether you want to sort ascending or descending. For asceding order, use 1, and for descending, use -1.
For this next example, let’s sort every document by age in descending order, returning only the _id and age.
db.staff.find( { }, { age: 1 } ).sort({ age: -1 })
Output:

Assume we wished to limit ourselves to only showing the first two documents in the previous query’s results, showing the oldest two staff members. We would tack limit(x) to the end of the query, with x representing the number of responses we would obtain.
db.staff.find( { }, { age: 1 } ).sort({ age: -1 }).limit(2)
Output:

Updating Documents
Earlier, we used the commands update() and save() to create a document. Both of these same commands can also be used for updating an existing document.
For starters, let’s select the document with the _id of 477 and add 4 years to their age. Instead of having to set their age to one static value, we can use $inc (short for increment) to accomplish this.
db.staff.update( { _id: 477 }, { $inc: { age: 4 } } )
Now let’s check the results:
Output:

It is possible to update more than one row at a time, so for this next example, we will select every document with the lname value being “Conway” and change it to “Curran”.
To modify multiple documents that satisfy the condition in the first set of brackets, we add a third set of brackets to the end containing multi: true, as can be seen below.
db.staff.update( { lname: "Conway" }, { $set: { lname: "Curran" } }, {multi: true} )
To check the results, I searched for all documents in the staff collection with lname equal to “Curran”, and then all documents with lname equal to “Conway”. As you can see in the figure below, “Conway” got no results, and “Curran got two.”

Using the save() method for updating documents requires that you know what the _id of the document is before updating it, otherwise, as explained before, it will create a new document. Also, when using save(), you will replace the entire document with the content of the save command. It will replace everything in that document with the contents it is given. Let’s use the save() method to change the fields of tthe document with _id of 478. We will change fname to Erin, lname to Marchesi, and we will set the age to 19. Note that the previous document had a middle name. This one will not.
db.staff.save({ _id: 478, fname: "Erin", lname: "Marchesi", age: 19 } )
Now let’s check the results:
Output:

As can be seen, even though the original had a mname, the save() function overwrote the entire document with what was passed to it. Be careful when using it.
Deleting Documents
Warning
You can not use remove() on a capped collection.
Deleting documents is a very simple task in the command prompt. There is one method for deleting documents, remove(), that can take zero to two arguments.
db.staff.remove()
Calling remove() with no arguments will remove all documents in that database, and while that may seem the easiest way to clean out a collection, it does not remove indexes. It may be more efficient to call drop() on that particular database if your intention is to clean it out entirely, since drop() removes all of the indexes.
db.staff.remove( {age: 19} )
Calling remove() with one argument will remove all documents who satisfy the conditions of the query in brackets (in this case, all documents with age being equal to 19). If you are deleting a large number of documents, consider copying all of the documents you wish to save to a new collection, and then calling drop() on the current database.
db.staff.remove( {age: 19}, 1 )
Calling remove() with two arguments, as shown above, removes only one document from the database that satisfies the conditions in the query. Instead of placing ‘1’ behind the comma, you can alternatively type ‘true’, and it will have the same effect.
MongoDB in Java
Connecting to MongoDB with Java requires only one library – the Mongo Java Driver, which is available from the MongoDB website in the Java Language Center(http://docs.mongodb.org/ecosystem/drivers/java/). The Java Language Center provides links to several third party libraries, but this demonstration uses version 2.10.1. of the official Mongo Java Driver(http://central.maven.org/maven2/org/mongodb/mongo-java-driver/2.10.1/).
Connecting
Connecting to only one instance of MongoDB is fairly simple in Java. To connect to only one instance of MongoDB , create a new MongoClient object and enter two arguments, a String containing the host URL, and an integer for the port number.
Note
Creating a new MongoClient object with no arguments in the constructor will default to connecting to localhost:27017. Alternatively, if you only enter a host name, it will connect to the host using the default port (27017).
try {
        MongoClient mon = new MongoClient("localhost", 27017);
}
catch (UnknownHostException e) {
        e.printStackTrace();
}
In the above example, the host name and port number are both used to create a ServerAddress object inside the Mongo object. It is possible to connect to a sharded cluser with the same constructor by making the argument in the Mongo object a list of ServerAddress objects. An example is seen below.
try {
        MongoClient mon = new MongoClient(Arrays.asList(
        new ServerAddress("localhost", 27017),
        new ServerAddress("localhost", 27018),
        new ServerAddress("localhost", 27019)));
}
catch (UnknownHostException e) {
        e.printStackTrace();
}
Note
Mongo is able to tell the difference between a mongos server and a list of replica set members.
Warning
If one of the ServerAddresses cannot connect to Mongo, it will return an error message.
To access a database, you need to create a database object and point it to a database in Mongo. Do this by creating a DB object and calling MongoClient.getDB(String X).
If your MongoDB has authentication, you can check authentication by calling DB.authenticate(String username, char[] password), which returns a boolean value. An example of both connecting to a database (we will be connecting to the company database created earlier) and authentication is shown below;
     try {
                     MongoClient mon = new MongoClient("localhost", 27017);
                     DB db = mon.getDB("company");
                     boolean auth = db.authenticate(username, password); //Optional
             }
     catch (UnknownHostException e) {
             e.printStackTrace();
     }
Reading Documents
In order to read any documents at all, we need a way to go into the collection that contains the documents we need. To accomplish this, we call a new DBCollection object. A DBCollection object is the Java representation of a collection. To get a specific collection in a DB object, use DB.getCollection(String s), which returns a DBCollection of the contents of a collection sharing a name with String s. If there is no collection sharing the same name, an empty DBCollection is created.
Next, create a DBCursor object, which is essentially an iterator for query results. The DBCollection.find(BasicDBObject query) method returns a DBCursor of the results of a query as defined by the BasicDBObject. DBCollection.find() works the same way the db.collection.find() command does in the shell, as leaving no arguments will return every item in the collection. Once we have a DBCursor, we can iterate through it by using a loop to retrieve each result contained in the DBCursor.
For this example, assume that all of the remove operations that were done in the shell have been undone.
     import java.net.UnknownHostException;
     import com.mongodb.DB;
     import com.mongodb.DBCollection;
     import com.mongodb.DBCursor;
     import com.mongodb.MongoClient;

     public class Example01_GetAllItemsFromACollection {

             public static void main(String args[]) {

                     try {
                             MongoClient mon = new MongoClient("localhost", 27017);
                             DB db = mon.getDB("company");
                             DBCollection staffColl = db.getCollection("staff");

                             DBCursor cursor = staffColl.find();

                             while (cursor.hasNext()) {
                                     System.out.println(cursor.next());
                             }
                             cursor.close();

                     } catch (UnknownHostException e) {
                             e.printStackTrace();
                     }

             }
     }
Output:
{ "_id" : { "$oid" : "528845205e9f772541afc58a"} , "fname" : "Mike" , "lname" : "Curran" , "age" : 29.0}
{ "_id" : 477.0 , "age" : 38.0 , "fname" : "Kevin" , "lname" : "Curran" , "mname" : "James"}
{ "_id" : 478.0 , "fname" : "Erin" , "lname" : "Marchesi" , "age" : 19.0}
The first document, as was the case earlier, has its assigned ObjectID, here shown as “$oid”. Note that all of the numerical values are shown as decimals here.
To make a query have some kind of condition, you will need to send a BasicDBObject to the DBCollection.find(BasicDBObject query) method. When creating a BasicDBObject(a, b), we will add a condition for our query, where a is the name of the field or condition, and b is the value. BasicDBObject query = new BasicDBObject(“lname”, “Curran”); will return all values where the lname field equals “Curran”. If we wish to add more conditions, we use the BasicDBObject.append(String a, Object b) method to add more conditions to the query. To add a conditions which use a query operator, such as returning all documents where the field age is a value less than 30, we use BasicDBObject.append(“age”, new BasicDBObject(“$lt”, 30));. Here, we add another BasicDBObject as the second argument, and place the conditional operator in the first argument.
The code below will return all documents with lname equal to “Curran” and with age less than 30.
     import java.net.UnknownHostException;

     import com.mongodb.BasicDBObject;
     import com.mongodb.DB;
     import com.mongodb.DBCollection;
     import com.mongodb.DBCursor;
     import com.mongodb.MongoClient;

     public class Example02_GetAllItemsNamedCurran {

             public static void main(String args[]) {

                     try {
                             MongoClient mon = new MongoClient("localhost", 27017);
                             DB db = mon.getDB("company");
                             DBCollection staffColl = db.getCollection("staff");

                             // Create query conditions as a BasicDBObject
                             BasicDBObject query = new BasicDBObject("lname", "Curran");

                             // Append another condition to return all documents with age less
                             // than 30.
                             query.append("age", new BasicDBObject("$lt", 30));

                             DBCursor cursor = staffColl.find(query);

                             while (cursor.hasNext()) {
                                     System.out.println(cursor.next());
                             }
                             cursor.close();

                     } catch (UnknownHostException e) {
                             e.printStackTrace();
                     }

             }
     }
Output:
{ "_id" : { "$oid" : "528845205e9f772541afc58a"} , "fname" : "Mike" , "lname" : "Curran" , "age" : 29.0}
Creating Documents
In the previous example, we saw how to use the BasicDBObject to read from a document. Using the same means, we can use it to create a new document.
     import java.net.UnknownHostException;

     import com.mongodb.BasicDBObject;
     import com.mongodb.DB;
     import com.mongodb.DBCollection;
     import com.mongodb.DBCursor;
     import com.mongodb.MongoClient;

     public class Example03_CreateNewDocument {

             public static void main(String args[]) {

                     try {
                             MongoClient mon = new MongoClient("localhost", 27017);
                             DB db = mon.getDB("company");
                             DBCollection staffColl = db.getCollection("staff");

                             // Create query conditions as a BasicDBObject
                             BasicDBObject query = new BasicDBObject("_id", 479)
                                             .append("fname", "Anakin")
                                             .append("lname", "Skywalker")
                                             .append("age", 10);

                             staffColl.insert(query);

                             // Read all documents when we are finished so we can check the
                             // output.
                             DBCursor cursor = staffColl.find();

                             while (cursor.hasNext()) {
                                     System.out.println(cursor.next());
                             }
                             cursor.close();

                     } catch (UnknownHostException e) {
                             e.printStackTrace();
                     }

             }
     }
Output:
{ "_id" : { "$oid" : "528845205e9f772541afc58a"} , "fname" : "Mike" , "lname" : "Curran" , "age" : 29.0}
{ "_id" : 477.0 , "age" : 38.0 , "fname" : "Kevin" , "lname" : "Curran" , "mname" : "James"}
{ "_id" : 478.0 , "fname" : "Erin" , "lname" : "Marchesi" , "age" : 19.0}
{ "_id" : 479 , "fname" : "Anakin" , "lname" : "Skywalker" , "age" : 10}
As you can see in the highlighted lines in the code shown above, we use BasicDBObject in almost the same way for reading and creating. The only major difference is the presence of DBCollection.insert(BasicDBObject query), which essentially mimics the db.collection.insert() method in the command prompt. Notice too that the numerical values that we entered are appearing as integers instead of decimals.
Updating Documents
The BasicDBObject can also be used for update queries as well. In this section, we will show how to perform a db.collection.update() command in Java. In order to run the update query, we need to create a second BasicDBObject in order to modify the fields that we want to update. We then pass this second BasicDBObject to the DBCollection.update() method, which accepts two BasicDBObjects, the first to specify the objects that you will be updating. The second BasicDBObject will determine what fields will be updated. You can optionally add two booleans, the first to determine the upsert flag, and the second to determine the multi flag.
An example of how to use this is shown below.
     import java.net.UnknownHostException;

     import com.mongodb.BasicDBObject;
     import com.mongodb.DB;
     import com.mongodb.DBCollection;
     import com.mongodb.DBCursor;
     import com.mongodb.MongoClient;

     public class Example04_UpdateDocument {

             public static void main(String args[]) {

                     try {
                             MongoClient mon = new MongoClient("localhost", 27017);
                             DB db = mon.getDB("company");
                             DBCollection staffColl = db.getCollection("staff");

                             // Pick the object to update by parameters.
                             BasicDBObject findQuery = new BasicDBObject("fname", "Anakin")
                                             .append("lname", "Skywalker");

                             // Query for the fields to insert into update.
                             BasicDBObject updateQuery = new BasicDBObject("fname", "Darth")
                             .append("lname", "Vader").append("age", 35);

                             // Booleans for upsert and multi
                             boolean upsert = false;
                             boolean multi = false;

                             // Run the update query.
                             staffColl.update(findQuery, updateQuery, upsert, multi);

                             // Read all documents when we are finished so we can check the
                             // output.
                             DBCursor cursor = staffColl.find();

                             while (cursor.hasNext()) {
                                     System.out.println(cursor.next());
                             }
                             cursor.close();

                     } catch (UnknownHostException e) {
                             e.printStackTrace();
                     }

             }
     }
Output:
{ "_id" : { "$oid" : "528845205e9f772541afc58a"} , "fname" : "Mike" , "lname" : "Curran" , "age" : 29.0}
{ "_id" : 477.0 , "age" : 38.0 , "fname" : "Kevin" , "lname" : "Curran" , "mname" : "James"}
{ "_id" : 478.0 , "fname" : "Erin" , "lname" : "Marchesi" , "age" : 19.0}
{ "_id" : 479 , "fname" : "Darth" , "lname" : "Vader" , "age" : 35}
As you may remember, there is another command that is used for updating documents in MongoDB, that being db.collection.save(). The DBCollection.save() works in much the same way that the db.collection.save() did in the console. DBCollection.save() can take a BasicDBObject and perform the save operation on the database. The below example shows it being used to both create a new document and to modify an existing one.
     import java.net.UnknownHostException;

     import com.mongodb.BasicDBObject;
     import com.mongodb.DB;
     import com.mongodb.DBCollection;
     import com.mongodb.DBCursor;
     import com.mongodb.MongoClient;

     public class Example05_SaveDocument {

             public static void main(String args[]) {

                     try {
                             MongoClient mon = new MongoClient("localhost", 27017);
                             DB db = mon.getDB("company");
                             DBCollection staffColl = db.getCollection("staff");

                             // Pick the object to update by parameters.
                             BasicDBObject saveNew = new BasicDBObject("fname", "Luke")
                                     .append("lname", "Skywalker")
                                     .append("age", 20);

                             // Query for the fields to insert into update.
                             BasicDBObject saveUpdate = new BasicDBObject("_id", "479")
                                     .append("fname", "James").append("mname", "Earl")
                                     .append("lname", "Jones").append("age", 82);

                             // Run the save queries.
                             staffColl.save(saveNew);
                             staffColl.save(saveUpdate);

                             // Read all documents when we are finished so we can check the
                             // output.
                             DBCursor cursor = staffColl.find();

                             while (cursor.hasNext()) {
                                     System.out.println(cursor.next());
                             }
                             cursor.close();

                     } catch (UnknownHostException e) {
                             e.printStackTrace();
                     }

             }
     }
Output:
{ "_id" : { "$oid" : "528845205e9f772541afc58a"} , "fname" : "Mike" , "lname" : "Curran" , "age" : 29.0}
{ "_id" : 477.0 , "age" : 38.0 , "fname" : "Kevin" , "lname" : "Curran" , "mname" : "James"}
{ "_id" : 478.0 , "fname" : "Erin" , "lname" : "Marchesi" , "age" : 19.0}
{ "_id" : 479 , "fname" : "Darth" , "lname" : "Vader" , "age" : 35}
{ "_id" : { "$oid" : "5289abff7cf311038788282f"} , "fname" : "Luke" , "lname" : "Skywalker" , "age" : 20}
{ "_id" : "479" , "fname" : "James" , "mname" : "Earl" , "lname" : "Jones" , "age" : 82}
Deleting Documents
Removing documents from Mongo in Java is almost the exact same code as creating or updating a document. The main difference is that to remove a document, we call DBCollection.remove() and pass a BasicDBObject to it. In the following example, we will remove one document based on specific fields.
     import java.net.UnknownHostException;

     import com.mongodb.BasicDBObject;
     import com.mongodb.DB;
     import com.mongodb.DBCollection;
     import com.mongodb.DBCursor;
     import com.mongodb.MongoClient;

     public class Example06_RemoveDocument {

             public static void main(String args[]) {

                     try {
                             MongoClient mon = new MongoClient("localhost", 27017);
                             DB db = mon.getDB("company");
                             DBCollection staffColl = db.getCollection("staff");

                             // Pick the object to delete by parameters.
                             BasicDBObject deleteMe = new BasicDBObject("fname", "Luke")
                                     .append("lname", "Skywalker")
                                     .append("age", 20);

                             // Run the remove queries.
                             staffColl.remove(deleteMe);

                             // Read all documents when we are finished so we can check the
                             // output.
                             DBCursor cursor = staffColl.find();

                             while (cursor.hasNext()) {
                                     System.out.println(cursor.next());
                             }
                             cursor.close();

                     } catch (UnknownHostException e) {
                             e.printStackTrace();
                     }

             }
     }
Output:
{ "_id" : { "$oid" : "528845205e9f772541afc58a"} , "fname" : "Mike" , "lname" : "Curran" , "age" : 29.0}
{ "_id" : 477.0 , "age" : 38.0 , "fname" : "Kevin" , "lname" : "Curran" , "mname" : "James"}
{ "_id" : 478.0 , "fname" : "Erin" , "lname" : "Marchesi" , "age" : 19.0}
{ "_id" : 479 , "fname" : "Darth" , "lname" : "Vader" , "age" : 35}
{ "_id" : "479" , "fname" : "James" , "mname" : "Earl" , "lname" : "Jones" , "age" : 82}
Automatic Sharding
Among MongoDB’s core functionalities is that it utilizes horizontally scaling, also known as sharding. Sharding is the practice of dividing the data set and distributing each piece, or shard of the data set to different servers as an independent database. The shards form one single database logically, even though they may be in different locations. As the number of shards increases, the operations that each shard has to handle decreases, as does the amount of data each shard possesses.
The above diagram shows the basic idea of sharding. Each of the four colored boxes in the corners is part of the multicolored box in the center (representing the complete data set), but they all exist separately in different locations.
Warning
You cannot perform sharding on a collection larger than 256GB – this is a limitation that MongoDB will eventually remove. Earlier versions of MongoDB had a much smaller limit.